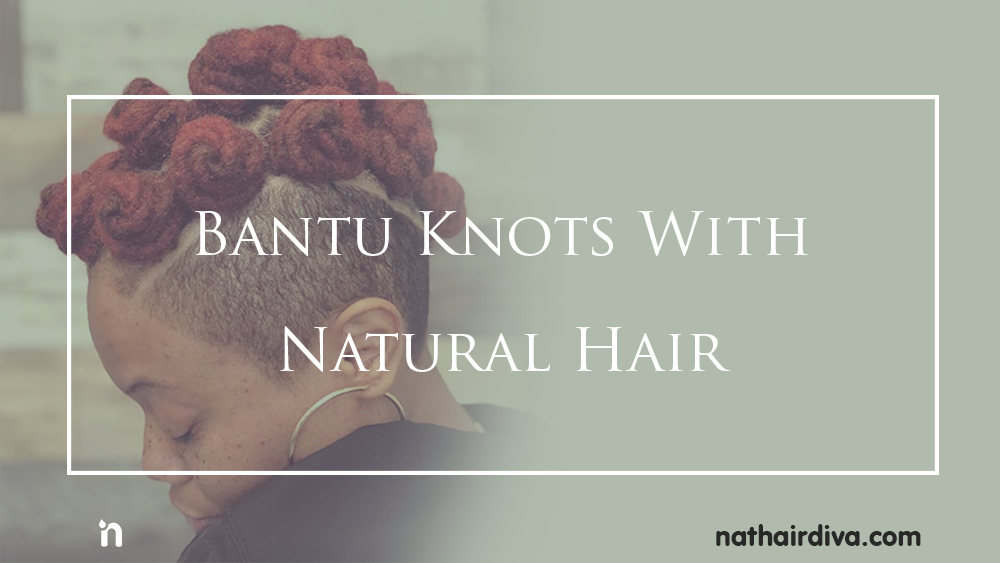
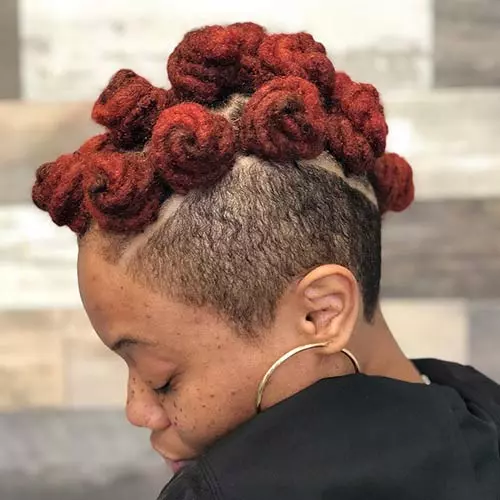
Bantu knots with Natural Hair is a traditional flirty style acknowledged by African women of certain cultural groups and some women of African descent. They are small curly buns secured against the side of the head and are created by taking small sections of hair and twisting them from root to ends to form little knots. However, these knots varies depending on the length of the hair. However, Bantu Knot is also known in some regions as Chiney Bumps.
What is Bantu Knot?
Bantu knots with Natural Hair is a traditional cute flirty style acknowledged by African women of certain cultural groups.
Characteristics of Bantu Knots with Natural Hair
Bantu knots help create tight curls for all hair types, the smaller the knot the tighter the curls. By curls, we mean the shape your hair takes when you lose your Bantu knot. They can be worn with any fashion style and also on the red carpet. Whichever way you choose to wear them just know that you will look gorgeous on them!.
How to do the perfect Bantu Knots with Natural Hair.
The steps below describes the content of the video. You can read through if you cannot watch the video
i. Wash Hair:
The first step is to wash your hair then divide your hair into sections and dry your hair out. The appropriate width will differ depending on the length of the hair as well as the style you want to go for. Take note, the bigger the section the bigger the curls.
ii. Apply moisturizer:
Moisturize your hair fairly to make it easy to get the hair in the right style. Using your finger or a styling comb, work the product into your hair evenly.
iii. Twist:
Rub the styling product onto your finger and twist a section of your hair between your fingers starting from the roots to the top.
iv. Wrap a small coil at the base of your scalp:
Wrap each section of hair for a few turns in between your fingertips, as though screwing in a screw. Only wrap the hair enough to create a short spring-like coil against your scalp. You should only twist to the mid part of the section you are working with because twisting the entire section into a knot can cause breakage.
iv. Wrap the remaining hair around this section (Knotting):
Gradually wind the remaining hair in the section around the base coil, bring the hair closer to your scalp with each wrapped layer.
If the coils are evenly tight, you will find it easy to pin the end of the twist to the base of the coil. Also, if the coils feel a little loose, try to retwist them it makes them tighter. If that doesn’t work, a hairpin is an option.
v. Repeat the knotting process in the remaining section.
Apply the same knotting procedure, wrapping the remainder of each section around its corresponding coil and tuck or pin them in place.
vi. Wear your Bantu knots proudly:
At this point, the Bantu knots are complete so you can wear them around town as you please. Letting the knots down after they set can form a curly hairstyle as Bantu knot-outs.
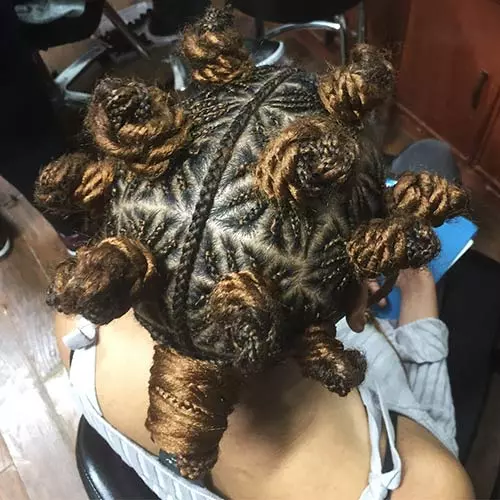
Types of Bantu knots.
There are different types of Bantu knots to try out, however, all have the same underlying principles.
i. Braided triangular Bantu knots

How to make
This is quite easy to do as it is done by making triangular sections as shown above.
ii. Faux Tri Bantu knots Mohawk
Rocked best in short hair, this can be achieved with the help of hair extensions, wrap extensions around your hair, twisting them as you go and make three columns of Bantu knots.
iii. Twist and Braids :
Braid your hair a little at the beginning. To make the knot, twist and wrap your hair around itself.
iv. Cornrow and Bantu knot wheel:
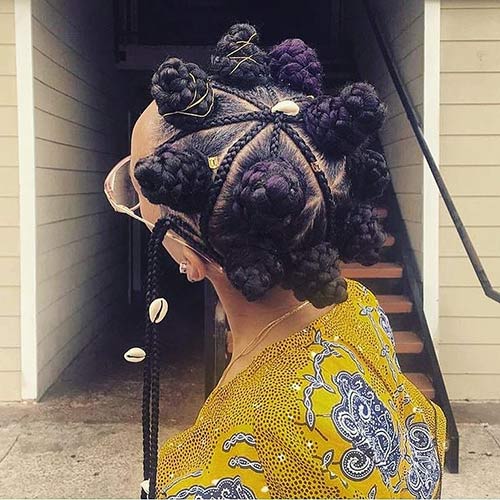
Part hair into triangular sections and take a bit of hair from the sides of each section, they will make up the ten braid. Braid the rest of the parts and make them Bantu knots.
v. Frontal Bantu knots:

Part your front hair in three sections, making the middle section a triangle. Furthermore, in the middle section only, twist the hair into a Bantu knot.
vi. Micro Bantu knot (Micro knot):

However, you might be wondering how you can achieve this style with short hair. Just continue reading.
Bantu knots on short hair
i. Moisturize hair with favourite styling products: This could be styling cream or oil just make sure your product is distributed properly and your hair saturated.
ii. Begin sectioning hair in small triangles: Note, the smaller the section the more defined curls will be.
iii. Starting from the ends detangle your hair.
iv. From root to ends begin twisting your hair firmly but gently.
v. Secure and pin each twist to your scalp with a hairpin: Keep your
Bantu knots up overnight or sits underneath the hooded dryer.
vi. During the takedown, apply a light oil to your hand and gently separate it.
Bantu knots with natural hair can also be done when the hair is dry
Bantu Knots in Dry Hair
Here are simple steps to follow to make Bantu knots on a dry hair:
i. Section hair into squares and triangle using a comb.
ii. Apply curling cream, butter or oil and make sure to apply on every inch of hair.
iii. Detangle hair to avoid breakage also be careful since hair is dry.
iv. Once you have a well-sectioned hair off the way, you twist the hair and roll it around itself.
Was this helpful?

Was this helpful?

0

0
2 replies on “Bantu Knots with Natural Hair”
[…] This is one of the simplest protective styles out there depending on how small or big you want it to be. Here is a picture from Instagram of Rihanna rocking Bantu knots. As with most natural hairstyles, these Bantu knots can be rocked in different ways. Check out how to make bantu knots yourself. […]
[…] This is for days when you want something simple but loud that won’t require brushing or restyling to maintain the style. You can check out a step by step way of making Bantu knot styles […]